
 Deutsch
 Dansk
Dansk Suomi
Suomi Latviešu
 Lietuvių
 Norsk bokmål
 polski
 Русский
 Svenska
No products in the cart.
Uncategorized
How to Set Up Off-Peak EV Charging at Home
18
Oct
Oct
What if your EV is plugged in overnight but still starts charging at the wrong time? Setting a timer is only half the job. To learn how to set up off-peak ev charging reliably, match your electricity plan’s actual low-rate window with one schedule in your vehicle, charger, or app.
It’s easy to assume that “off-peak” means the same hours on every plan. It doesn’t. Some tariffs use fixed time-of-use windows, while dynamic plans can change rates during the day. And if both your car and charger have active schedules, conflicting controls can delay charging or prevent it from starting when expected.
This guide walks you through a practical setup: find the eligible hours and conditions in your electricity plan, choose one schedule owner, and set charging to finish before your next departure. You’ll also learn how to leave a sensible charge buffer, so a lower-rate session doesn’t leave you short when you need to drive. Follow the steps, test the schedule, and make sure your routine works for both your tariff and your daily needs.
Key Takeaways
- Find the off-peak hours and any conditions in your electricity plan before setting a charging timer.
- Learn how to set up off-peak ev charging by choosing one control point: your vehicle, charger, or compatible app.
- Set charging around the tariff window and the amount of energy you need before your next departure.
- Test the schedule and remove conflicting timers so charging follows the control method you chose.
- Build in a practical charge buffer for late returns, early departures, and changes to your usual driving routine.
How off-peak EV charging works, and what to check before setup
Off-peak charging means using electricity during lower-priced hours when your electricity plan offers a cheaper rate at those times. The goal is to charge during that lower-rate period rather than a more expensive one. There isn’t one universal overnight window: your supplier, location, tariff, and plan conditions determine whether off-peak pricing applies and when.
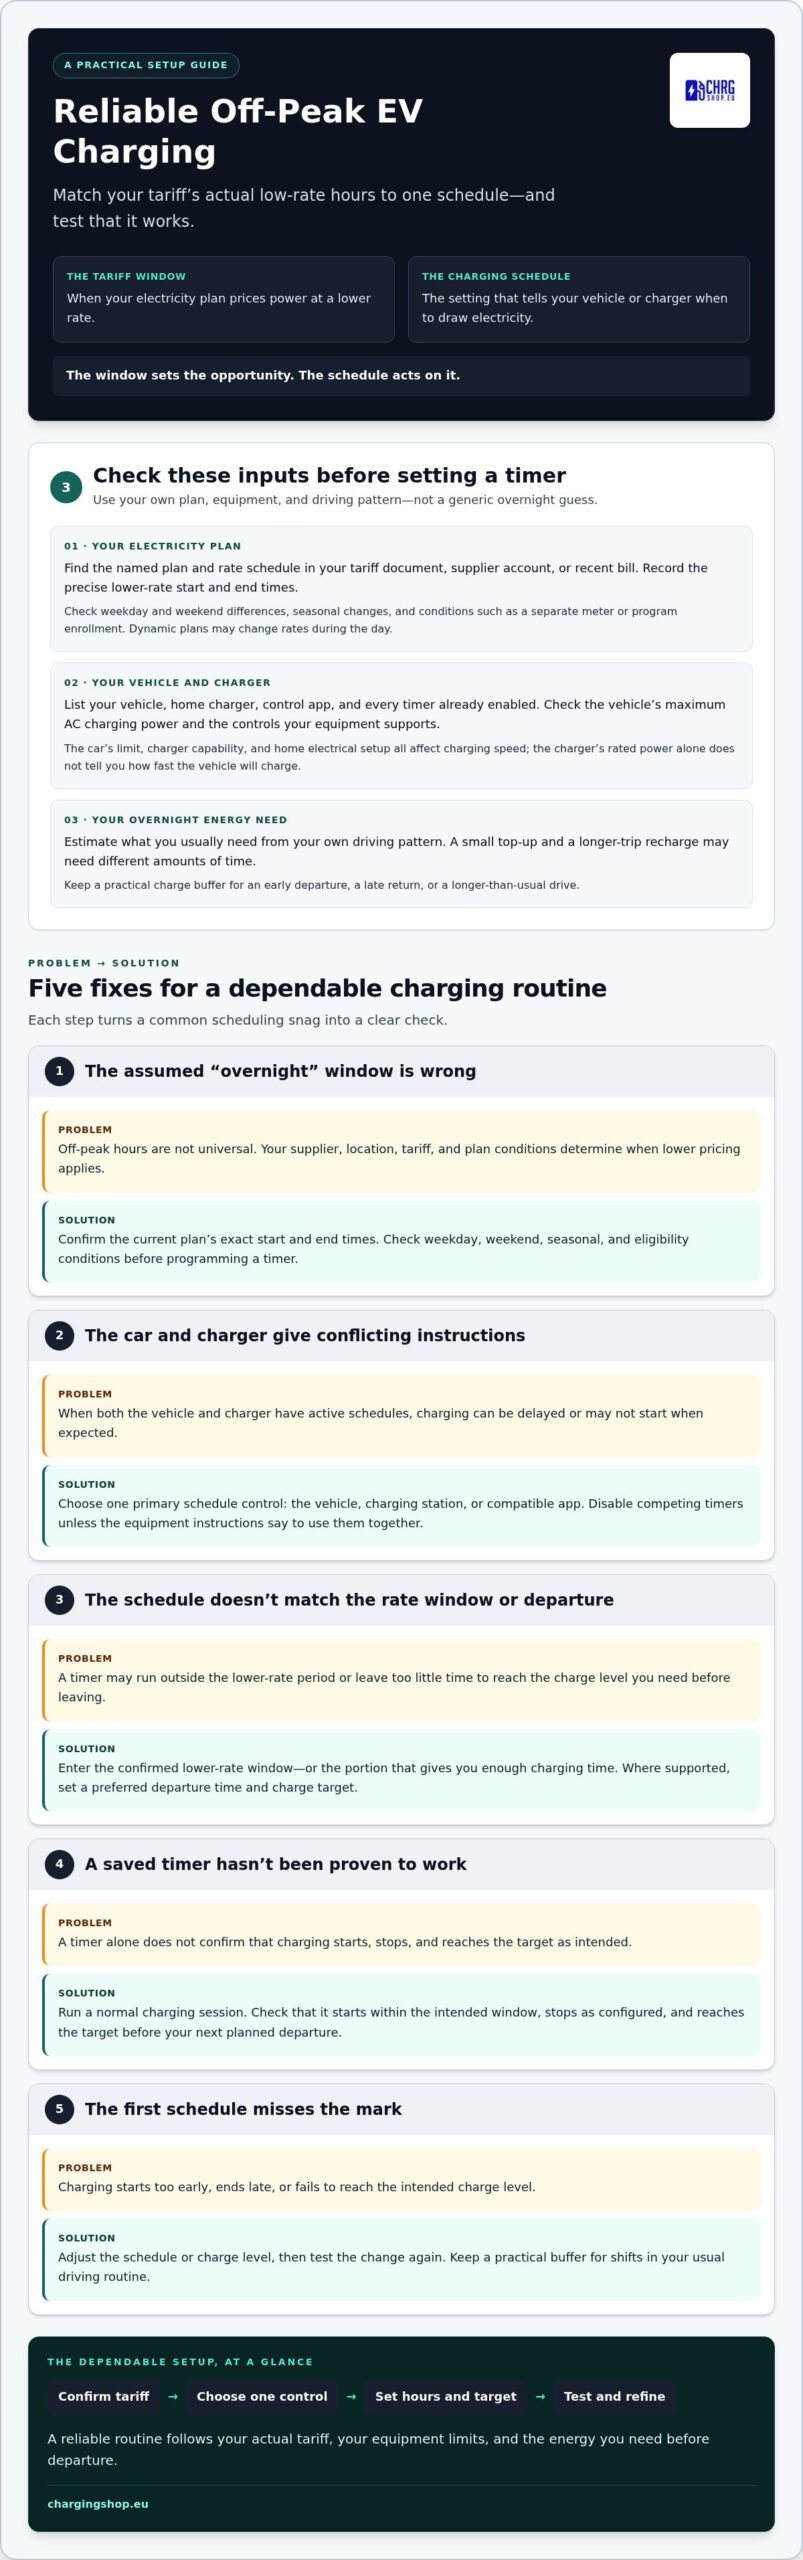
Quotable definition: An off-peak tariff window is the period your electricity plan prices power at a lower rate; a charger schedule is the setting that tells your vehicle or charger when to draw electricity. The window sets the opportunity. The schedule acts on it.
Check the tariff before choosing a timer. A time-of-use tariff sets different prices for electricity at different times. A utility incentive is a separate program that may offer a credit or other benefit under specific eligibility rules. Neither a time-based rate nor an incentive automatically applies to every driver. For a general primer on electric cars, charging methods, and vehicle-to-grid concepts, see Electric car charging and V2G technology.
How do you find your actual off-peak hours?
Start with the current tariff document, your supplier account, or a recent electricity bill. Find the named plan and its rate schedule, then write down the precise start and end times for the lower rate. Check whether the hours differ on weekdays and weekends, shift by season, or depend on conditions such as a separate meter or program enrollment. Use your own plan terms rather than another household’s schedule.
What needs to be ready before scheduling?
List your vehicle, home charger, control app, and every timer already enabled in the car or charger. Then check the vehicle’s maximum AC charging power in its specifications. The car’s limit, charger capability, and home electrical setup all affect how quickly it can charge, so the charger’s rated power alone doesn’t tell you how fast your vehicle will charge.
Estimate the energy you usually need overnight from your own driving pattern, not a generic daily-distance assumption. Some nights the battery may need only a small top-up; after a longer trip, it may need more. This estimate helps you decide whether the off-peak window gives you enough time to reach your intended charge level. Keep a practical buffer for an early departure or an unexpectedly longer drive.
Before programming a schedule, make three notes:
- The tariff’s exact lower-rate hours and any weekday, weekend, or seasonal differences.
- The vehicle’s charging limit and the controls it supports.
- Your usual overnight energy need, plus any existing timers that could compete with the new schedule.
These checks make how to set up off-peak ev charging a tariff-first process, not a guess at what “overnight” means. Once the rate window and equipment limits are clear, you can choose a scheduling method that fits both the hours and your routine.
How to set up off-peak EV charging step by step
With your tariff window and equipment details ready, turn them into one simple routine. Aim to start charging within the lower-rate period and reach your chosen charge level before you need to leave. A timer alone doesn’t prove the setup works, so test a complete charging session and adjust based on the result.
Five-step setup: Confirm your tariff window, choose one schedule control, enter the charging hours and target, test a complete charging session, then review and adjust the settings.
- Confirm the tariff. Use the start and end times in your current plan, including different weekday or weekend hours. Don’t base your schedule on a general “overnight” estimate.
- Choose one schedule control. Decide whether the vehicle or charging station will manage the routine. Check the relevant instructions and disable competing timers unless the manufacturer’s guidance says to use them together.
- Set the charging period. Enter the confirmed lower-rate window, or the part of it that gives you enough time to charge. If your chosen control allows it, add your preferred departure time and charge target.
- Test the setup. Plug in as you normally would and check whether charging starts within the intended window. Confirm it stops as configured and that the vehicle reaches the target before departure.
- Review and refine. If charging starts too early, ends late, or misses the target, adjust the schedule or charge level. Test the change again rather than assuming the first setting will suit every routine.
Set the schedule in your vehicle or charging station
Menu names and available controls vary by vehicle, charger, and software, so follow the instructions for your equipment rather than relying on a generic button sequence. Enter the tariff hours and, where supported, your preferred departure time. If the charging station owns the schedule, avoid adding a conflicting vehicle timer unless the equipment instructions require it.
Keep the control simple. A schedule-capable charger can manage charging at home, but its controls aren’t automatically the same as a vehicle’s. For example, the V2C Trydan supports peak-shaving charge scheduling. Check the specific charger’s capabilities and use one primary timer to reduce the risk of overlapping instructions.
Run a first-charge test and confirm the result
Use a normal charging session to verify the full sequence. Check the start time, stop behavior, and vehicle charge level before your next planned departure. If the battery doesn’t reach your target, the window may be too short for the energy needed, or the settings may not be working together as intended. Adjust the start time or target, then test again.
Research on incentives and charging behavior can add context to your setup; the NBER research on off-peak EV charging incentives examines this connection. For a schedule-capable home charging option, explore EV charging hardware and compare its controls with your vehicle’s scheduling method.
Vehicle timer, smart charger, or app: which scheduling method fits?
Choose a schedule owner based on where you want to manage charging and what your equipment supports. A vehicle timer keeps a simple routine in the car. A charger schedule puts control at the charging point. An app is useful only if the specific vehicle or charger supports the scheduling function you need. Pick one primary control, then check equipment instructions before using any secondary timer.
Vehicle timer
Setup location: vehicle screen or companion app.
Control owner: the car.
Best fit: a regular routine with one vehicle that supports scheduled charging.
Smart charger
Setup location: charger controls or its supported app.
Control owner: the charging station.
Best fit: drivers who want to manage the schedule at the home charging point.
Third-party app
Setup location: the app, if compatible.
Control owner: the app or connected system, depending on its design.
Best fit: drivers whose specific vehicle or charger supports the required connection and scheduling features.
This comparison helps narrow down how to set up off-peak ev charging without activating every available timer. Overlapping schedules can make it unclear which setting controls a session. Use one primary schedule owner; combine controls only when the product instructions explain how they work together.
When is the vehicle’s built-in timer the simplest option?
Use the vehicle timer if your car supports scheduled charging and your routine is fairly consistent. It keeps the schedule with the vehicle, which can be convenient if you don’t need to manage charging elsewhere. Controls differ by make, model, and software, so follow your vehicle’s instructions rather than expecting the same settings across cars. If you change vehicles or adjust charging settings, review the timer.
When does a connected charger make more sense?
A charger schedule suits drivers who want to manage charging at the station rather than through the vehicle. It can also make the charger the clear owner of the routine, provided competing vehicle timers are disabled or configured according to the manufacturer’s directions. Charger scheduling options vary by model, so compare the controls for the specific charger you’re considering.
The V2C Trydan 22kW Solar supports peak-shaving charge scheduling. That is a product-specific capability, not a feature to assume across all chargers. Its relevance depends on your setup and how you intend to manage charging. For more product-specific context, see the V2C Trydan 22kW smart home charging guide.
Apps aren’t automatically a fourth layer of control. A vehicle’s companion app may provide access to its own timer, while a charger app may manage the station. A third-party energy-management app can only coordinate the devices and tariff functions it supports. Before relying on an app, identify which device it controls and whether another active schedule could override or delay its instructions.
- Choose the vehicle for a straightforward car-based routine.
- Choose the charger when you want scheduling managed at the station.
- Choose an app only when your equipment supports the scheduling connection you need.
Make your off-peak schedule dependable for real driving routines
A lower-rate session only helps if the vehicle is ready when you need it. Set a charge target that reflects your next trip and your vehicle’s needs, then leave enough time between charging and departure to handle small changes in routine. You don’t need to charge to the same level every night if your driving needs vary. Adjust the target to match the next planned use.
Build flexibility into the routine. If you get home later than usual, plug in as normal and check whether the remaining tariff window is enough for the energy you need. If you must leave earlier, consider charging sooner or changing the target for that session, if your vehicle or charger allows it. Don’t rely on an overnight schedule for an urgent departure without checking the vehicle’s current charge status.
What if the off-peak window is too short?
Compare the energy you need with the hours available, then account for the charging capability of both the vehicle and charger. The vehicle’s maximum AC charging power and the charger’s limits affect how much energy can be added during that period. If the timing doesn’t work, first review your target or routine. A higher-rated charger alone won’t overcome limits elsewhere in the setup.
For example, if the car needs more energy than the usual window can deliver, consider whether every session needs that target. You might set a lower level for a short local trip and plan a longer session before a demanding drive. Keep the departure requirement in view, not just the tariff clock.
How do you avoid missed charging and schedule conflicts?
Keep one primary schedule active. Remove redundant timers where product instructions allow, and follow the manufacturer’s directions if the vehicle and charger are designed to coordinate. After changing a setting, check the vehicle or charger status. Do the same after the first few sessions to confirm charging starts and stops as intended.
Review the setup when your supplier, tariff, vehicle, charger settings, or driving routine changes. A plan update can change the lower-rate hours, while a new commute can change the energy you need before departure. Check the current tariff and schedule together rather than assuming the old setup still fits. Savings depend on your electricity rates, how much energy you use, and when charging takes place, so don’t rely on a fixed saving estimate.
If you manage multiple stations, separate household charging from wider station management. Charging Shop provides free access to the CHRG Network for station owners managing their charging infrastructure.
For a home charging setup that fits your routine, explore EV charging options and compare the available controls with your vehicle’s requirements.
Choose schedule-ready charging hardware and put your setup into action
You’ve done the important groundwork: identified the tariff window, chosen a control method, and tested the charging routine. Now make sure the hardware fits that setup. For a household with one vehicle and a consistent departure time, a straightforward timer may be enough. Fleet and public charging operations have separate management needs, so don’t assume a home schedule will cover them.
Your setup in one line: Match the tariff window to a compatible schedule control, choose a charge target that suits your next trip, leave a departure buffer, and confirm the first session works as intended. That’s the practical foundation for how to set up off-peak ev charging.
What to look for in a schedule-capable charger
Check the exact charger model’s documented scheduling and connectivity features, then compare them with the control method you plan to use. Don’t assume every charger supports peak-shaving charge scheduling or offers the same app functions. The product name alone doesn’t establish how its controls work; use model-specific information to make the match.
The V2C Trydan 22kW Solar supports peak-shaving charge scheduling, along with Wi-Fi, Bluetooth, OCPP 1.6, and Modbus RTU. It can also charge from solar inverters. These are specific product capabilities, not a promise that every feature will suit every home setup. If solar is part of your decision, check that the charger’s inverter compatibility and your intended setup match your needs.
Turn the setup into a repeatable routine
Keep a short reference for your setup: the tariff hours, which device owns the schedule, your usual target charge, and the departure buffer you need. After a first session, note whether the vehicle reached its target on time. This gives you a useful baseline and makes it easier to spot a change instead of repeatedly adjusting settings without knowing what worked.
Revisit the routine if your electricity plan changes or your regular driving pattern shifts. A different departure time or longer commute can change the charge level you need, while a tariff update may alter the hours worth targeting. Check both the schedule and the vehicle’s charging status after making changes.
For a typical home user, keep the setup focused: one vehicle, one primary schedule control, and a target that reflects the next drive. For multiple stations or public and fleet operations, consider those management requirements separately instead of stretching a household timer beyond its purpose.
Choose hardware only after you know which scheduling controls your routine requires. Explore EV charging hardware at Charging Shop and compare the documented capabilities with your vehicle, tariff, and charging needs.
Build a charging routine that keeps working
Your first schedule is a starting point, not a set-and-forget decision. As your driving needs or electricity plan change, revisit the setup and choose hardware that matches the controls you’ll actually use. For example, the V2C Trydan supports peak-shaving charge scheduling, while the right choice for your home depends on your vehicle, routine, and charging requirements.
Charging Shop offers a personalised charging offer to help you compare charging options. Station owners can also get free access to the CHRG Network, a cloud-based system for managing charging infrastructure. Keep the next step focused on your needs, whether you’re comparing schedule-capable hardware for home or considering separate management tools for multiple stations.
Ready to move from plan to setup? Explore EV charging hardware at Charging Shop and find an option that fits your charging routine. With the right match, you can make how to set up off-peak ev charging a practical part of everyday driving. Start with your needs, then build a routine you can rely on.
Frequently Asked Questions
How do I find my electricity provider’s off-peak hours?
Use the latest tariff information in your supplier account, bill, or plan document. Search for terms such as “time-of-use,” “reduced rate,” or “night rate,” then verify the full schedule and conditions. A bill may show the rate you paid without listing every time window clearly, so use the plan details for exact hours. If you recently changed plans, don’t rely on an older bill or saved charging timer.
Can I schedule off-peak EV charging through my car?
Yes, if your vehicle supports scheduled charging. The controls and options vary by model, so consult the vehicle’s instructions and check whether its timer can match your plan’s rate period. If you’re learning how to set up off-peak ev charging, start by checking the car’s timer before adding another control in a charger app. After changing settings, confirm the vehicle displays the schedule you intended.
Should I schedule EV charging in the car or the charger?
Choose the control that best fits how you use the vehicle. A car timer can be convenient if the same vehicle follows the same routine, while a charger schedule may suit a household that prefers to manage charging at the station. Check the specific product instructions, since available controls differ. If more than one device has a timer, decide which one should lead before adjusting the other.
Will off-peak charging finish before my morning departure?
It can, if the available charging period is long enough for the energy you need and the vehicle can accept that charging power. Check the target charge shown by the car, then review its status after the first scheduled session. If it falls short, consider whether you need that target for the next trip. Adjust your plan for days with an early departure rather than assuming the usual routine will cover them.
Can I use a smart charger schedule and a vehicle timer together?
Sometimes, but the two controls need to work together as described in their product instructions. If one timer delays charging until after the other has stopped, the session may not start when expected. For a straightforward setup, make one control responsible for the schedule and remove redundant settings where the instructions allow. After changing either timer, check the next session’s start time and the vehicle’s final charge level.
How much can off-peak EV charging save?
There’s no single saving amount that applies to every driver. A useful estimate starts with the difference between your plan’s rates and the amount of electricity you shift into the lower-priced period. Compare the unit rates on your own tariff and review your charging use over a billing period. Include relevant plan conditions or fees, and don’t treat another region’s advertised savings as a prediction for your household.
